4.4.4 Configure A Dhcp Relay Agent
Onlines
Mar 25, 2025 · 6 min read
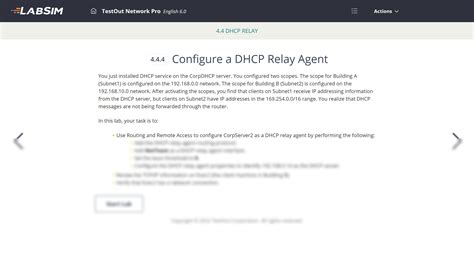
Table of Contents
Configuring a DHCP Relay Agent: A Comprehensive Guide
The DHCP (Dynamic Host Configuration Protocol) relay agent plays a crucial role in large networks, acting as a bridge between DHCP clients and servers across different subnets. This guide delves deep into the configuration of a DHCP relay agent, covering various scenarios, troubleshooting steps, and best practices. We'll focus primarily on the practical aspects, assuming a basic understanding of networking concepts and DHCP functionality.
Understanding the Need for a DHCP Relay Agent
In a simple network with a single subnet, a DHCP server can directly communicate with all DHCP clients. However, in larger, more complex networks with multiple subnets, this direct communication becomes problematic. This is where the DHCP relay agent steps in. It forwards DHCP client requests from one subnet to the DHCP server on a different subnet, and vice versa. This ensures that all clients, regardless of their location within the network, can obtain IP addresses and other necessary network configuration parameters.
Imagine a network with multiple VLANs or separate physical subnets. Clients on these subnets need DHCP services, but the DHCP server might reside on a different subnet. Without a relay agent, these clients would never receive an IP address. The relay agent solves this by acting as an intermediary, receiving client requests and forwarding them to the appropriate DHCP server, then relaying the server's responses back to the clients.
Common DHCP Relay Agent Implementations
Several operating systems and network devices can function as DHCP relay agents. Some popular examples include:
- Cisco IOS routers: Cisco routers are widely used in enterprise networks and offer robust DHCP relay agent capabilities. Configuration involves using the
ip helper-addresscommand. - Linux systems: Linux distributions, particularly those used in server roles, often employ the
dhcp-relaypackage or similar tools. Configuration usually involves modifying the/etc/dhcp-relay.conffile and restarting the service. - Windows Server: Windows Server operating systems also include DHCP relay capabilities. These are typically managed through the DHCP server management console. While the configuration is relatively straightforward through the GUI, understanding the underlying principles is crucial for effective troubleshooting.
- Network hardware (switches, etc.): Many modern network switches and other hardware devices incorporate integrated DHCP relay functionality, simplifying the network architecture.
Step-by-Step Configuration: A Practical Example (Linux)
We will focus on configuring a DHCP relay agent on a Linux system, using a common configuration method. Remember that the specific commands and file locations might vary slightly depending on your distribution. This example assumes you already have a DHCP server configured and running on a separate subnet.
1. Install the DHCP Relay Package
Begin by installing the necessary DHCP relay package. The exact package name may differ depending on your Linux distribution. For Debian-based systems (like Ubuntu), you would typically use:
sudo apt-get update
sudo apt-get install dhcp-relay
For Red Hat-based systems (like CentOS or Fedora), you might use:
sudo yum update
sudo yum install dhcp-relay
2. Configure the DHCP Relay Agent
The primary configuration file is usually located at /etc/dhcp-relay.conf. Open this file using a text editor with root privileges:
sudo nano /etc/dhcp-relay.conf
Add the following lines, replacing the placeholder IP addresses with your actual server and subnet information:
subnet 192.168.10.0 netmask 255.255.255.0 {
  option routers 192.168.10.1;
  option subnet-mask 255.255.255.0;
  forward 192.168.20.100;  #DHCP server IP address
}
This configuration tells the relay agent to forward DHCP requests from clients on the 192.168.10.0/24 subnet to the DHCP server at 192.168.20.100.
Explanation of Configuration Options:
subnet 192.168.10.0 netmask 255.255.255.0: This defines the subnet for which the relay agent should forward DHCP requests. Replace this with the actual subnet where clients reside.option routers 192.168.10.1;: This specifies the default gateway for clients on this subnet. This is essential for clients to communicate with the rest of the network, including the relay agent.option subnet-mask 255.255.255.0;: This specifies the subnet mask for the client subnet.forward 192.168.20.100;: This is the crucial line that defines the IP address of your DHCP server.
You can add multiple subnet blocks to handle multiple client subnets forwarding to the same or different DHCP servers.
3. Restart the DHCP Relay Service
After saving the configuration file, restart the DHCP relay service. The command varies depending on the distribution. For Debian/Ubuntu:
sudo systemctl restart isc-dhcp-relay
For Red Hat/CentOS/Fedora:
sudo systemctl restart dhcp-relay
4. Verify the Configuration
You can verify the configuration by using tools like tcpdump to capture DHCP packets. This involves monitoring network traffic to see if DHCP requests from the client subnet are being forwarded to the DHCP server and responses are being relayed back. This requires familiarity with command-line tools and network packet analysis.
Troubleshooting Common Issues
Configuring a DHCP relay agent can sometimes lead to unexpected problems. Here are some common issues and troubleshooting steps:
- Clients not receiving IP addresses: Double-check the subnet configuration in the
dhcp-relay.conffile, ensuring that the subnet, netmask, and DHCP server IP address are correct. Verify the DHCP server's configuration as well. Also, ensure the relay agent is running and that there are no firewall rules blocking DHCP traffic. - DHCP server not responding: Confirm that the DHCP server is up and running and that it can be reached from the relay agent. Check the server's logs for any errors.
- Relay agent not forwarding requests: Verify that the relay agent is functioning correctly by examining its logs and checking network traffic using tools like
tcpdump. Ensure the relay agent service is running. - Incorrect Gateway Configuration: Ensure the gateway address (
option routers) in the relay agent configuration is correctly set to the router interface connected to the client subnet.
Advanced Configurations and Best Practices
- Multiple DHCP Servers: Configure the relay agent to forward requests to multiple DHCP servers for redundancy or load balancing. This often involves using multiple
forwardstatements within a singlesubnetblock. - DHCP Options: You might need to configure additional DHCP options to be relayed, depending on your network's requirements. This often involves configuring these options in the DHCP server.
- Security Considerations: Use appropriate security measures, such as access control lists (ACLs), to protect the DHCP relay agent and prevent unauthorized access.
- Monitoring and Logging: Implement proper monitoring and logging to track DHCP relay agent activity and identify potential issues proactively. Regularly review logs for errors or warnings.
- Redundancy and Failover: Plan for redundancy by configuring multiple relay agents or using a high-availability setup to ensure continuous DHCP service.
Conclusion
Configuring a DHCP relay agent is a critical task in managing larger networks. Understanding the fundamental principles, meticulously following the configuration steps, and implementing proper troubleshooting techniques are essential for successful deployment. This guide provides a solid foundation for setting up and maintaining a reliable DHCP relay agent infrastructure, ensuring seamless network connectivity for all your devices. Remember to always consult the documentation for your specific operating system and network devices for the most accurate and up-to-date information. Continuous monitoring and proactive troubleshooting are vital for a robust and dependable DHCP environment.
Latest Posts
Latest Posts
-
Exploring Anatomy And Physiology In The Laboratory 4th Edition
Mar 25, 2025
-
Hannah Arendt The Human Condition Summary
Mar 25, 2025
-
Why Does Macbeth Want Banquo And Fleance Dead
Mar 25, 2025
-
What Is The Theme For Hatchet
Mar 25, 2025
-
The Physicians Signature Is Located In Block
Mar 25, 2025
Related Post
Thank you for visiting our website which covers about 4.4.4 Configure A Dhcp Relay Agent . We hope the information provided has been useful to you. Feel free to contact us if you have any questions or need further assistance. See you next time and don't miss to bookmark.
