Add Curved Arrows To Draw Step 2 Of The Mechanism
Onlines
Mar 29, 2025 · 6 min read
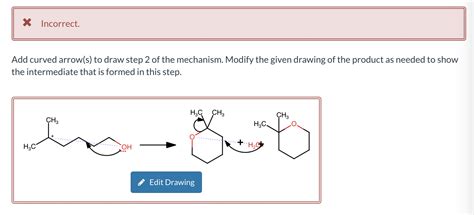
Table of Contents
Adding Curved Arrows to Draw Step 2 of a Reaction Mechanism: A Comprehensive Guide
Drawing reaction mechanisms is a crucial skill in organic chemistry. It allows us to visualize the flow of electrons during a chemical transformation, providing a deeper understanding of the process. While drawing the initial structures is straightforward, correctly depicting the movement of electrons using curved arrows in each step is where many students struggle. This article focuses specifically on mastering the art of adding curved arrows to depict step 2 of a reaction mechanism, building upon the foundation laid in step 1. We'll explore various scenarios and provide clear, step-by-step instructions to help you confidently tackle this aspect of organic chemistry.
Understanding the Fundamentals of Curved Arrows
Before diving into step 2, let's refresh our understanding of curved arrows themselves. They are essential tools that represent the movement of electron pairs during a reaction.
-
The Tail of the Arrow: This indicates the source of the electron pair – typically a lone pair, a pi bond, or a sigma bond.
-
The Head of the Arrow: This points to where the electron pair is moving – often toward a positively charged atom (electrophile), a partially positive atom (δ+), or forming a new bond.
-
Full-Headed vs. Half-Headed Arrows: Full-headed arrows represent the movement of two electrons (a lone pair or a pi bond), while half-headed arrows (fish-hook arrows) represent the movement of a single electron (a radical). This article focuses primarily on full-headed arrows, common in ionic reactions.
-
Concerted vs. Stepwise Mechanisms: Some reactions proceed through a concerted mechanism (all bond breaking and forming happen simultaneously), while others are stepwise, involving distinct intermediates. Curved arrows clearly illustrate these steps.
Common Scenarios in Step 2 of Reaction Mechanisms
Step 2 often builds upon the changes initiated in step 1. Let's analyze some frequent scenarios:
1. Nucleophilic Attack Following Protonation
Many reactions begin with protonation (step 1) to activate a molecule, making it more susceptible to nucleophilic attack in step 2. Consider an example involving an epoxide ring opening:
Step 1: Protonation of the epoxide oxygen.
Step 2: Nucleophilic attack by a negatively charged oxygen.
Here, the curved arrow in step 2 originates from the lone pair of the nucleophile's oxygen and points towards the electrophilic carbon of the protonated epoxide. This simultaneously breaks the C-O bond in the epoxide ring and forms a new C-O bond. The resulting product reflects this electron movement. The crucial aspect here is correctly showing the bond breaking and bond forming simultaneously, with a clear indication of the electron flow.
2. Rearrangement Reactions After Initial Bond Breaking
Step 2 might involve a rearrangement, a shift of atoms or groups within a molecule. This often occurs after an initial bond-breaking event in step 1. Carbocation rearrangements are prime examples:
Step 1: Formation of a carbocation.
Step 2: Hydride or alkyl shift.
The curved arrow in step 2 demonstrates the migration of a hydride or an alkyl group from one carbon to the adjacent carbocation center. It shows the shift of electron density to stabilize the positive charge, leading to a more stable carbocation intermediate. This illustrates the importance of curved arrows in showcasing the movement of electrons during structural rearrangements to explain the formation of specific products.
3. Deprotonation After Nucleophilic Addition
Nucleophilic addition reactions often involve a deprotonation step in step 2, following an initial nucleophilic attack in step 1.
Step 1: Nucleophilic attack on a carbonyl group (e.g., an aldehyde or ketone).
Step 2: Deprotonation by a base.
The curved arrow in step 2 shows the removal of a proton from the newly formed negatively charged oxygen by a base (e.g., hydroxide ion). The arrow starts from the bond between the proton and the oxygen and points towards the base. The correct placement and direction of the arrow are critical to accurately represent the electron flow and product formation.
4. Elimination Reactions Following Addition
Addition reactions can be followed by an elimination in step 2. This might involve the loss of a leaving group.
Step 1: Nucleophilic addition to an alkene.
Step 2: Elimination of a leaving group.
The curved arrow in step 2 shows the removal of the leaving group, with the electron pair moving to form a new pi bond. This simultaneously breaks the bond to the leaving group, creating an alkene. Careful attention must be paid to depicting the correct bond formation and breaking in this scenario.
Tips for Mastering Curved Arrows in Step 2
-
Practice Regularly: The key to mastering curved arrows is consistent practice. Work through numerous examples, varying the reaction types and complexities.
-
Start with the Simpler Reactions: Begin with straightforward reactions to build a strong foundation. Gradually increase the complexity as your understanding grows.
-
Identify Electron-Rich and Electron-Poor Centers: Accurately identifying nucleophiles (electron-rich) and electrophiles (electron-poor) is crucial. The arrows always originate from the electron-rich center and point towards the electron-poor center.
-
Maintain Consistent Arrow Direction: All arrows should flow smoothly and logically, illustrating a continuous electron movement. Avoid abrupt changes in direction.
-
Use a Clear and Uncluttered Drawing Style: Keep the structure drawing clear and easy to follow, and make sure the arrows are neat and precisely drawn.
Advanced Scenarios and Considerations
-
Concerted Reactions: In concerted reactions, multiple bond-breaking and bond-forming events occur simultaneously. In these instances, curved arrows must effectively demonstrate the synchronization of electron movement. It’s crucial to depict these movements accurately to represent the mechanism.
-
Pericyclic Reactions: These reactions involve cyclic electron movement, which can be challenging to portray with curved arrows. It's important to understand the orbital interactions and depict the flow of electrons in a manner reflecting these complex movements.
-
Radical Reactions: As mentioned, half-headed arrows are used for radical reactions, representing the movement of single electrons. These should be clearly distinguished from full-headed arrows in your drawings.
-
Transition States: Curved arrows are used to illustrate the transformation from reactants to products via transition states. While we don't explicitly draw transition states, the arrows provide an implicit representation of the movement of electrons during this crucial step.
Conclusion
Adding curved arrows to depict step 2 of a reaction mechanism requires a thorough understanding of electron movement and the principles of organic chemistry. By practicing regularly and paying attention to detail, you will improve your ability to accurately represent the intricate dance of electrons that determines the outcome of chemical reactions. Masterfully executed curved arrows not only demonstrate a firm understanding of the reaction mechanism but also are an essential communication tool for clearly conveying your understanding to others. Remember, consistent practice is the key to mastering this vital skill in organic chemistry. By carefully studying the examples and following the tips outlined here, you'll significantly enhance your ability to draw accurate and insightful reaction mechanisms.
Latest Posts
Latest Posts
-
Terri Owns A Computer Repair Shop
Mar 31, 2025
-
Which Of The Following Statements Is True Of Bullying
Mar 31, 2025
-
Please Place The Following Societies In Chronological Order
Mar 31, 2025
-
Un Dia De Primavera Antonio Y Alicia
Mar 31, 2025
-
The Author Most Likely Included This Paragraph To
Mar 31, 2025
Related Post
Thank you for visiting our website which covers about Add Curved Arrows To Draw Step 2 Of The Mechanism . We hope the information provided has been useful to you. Feel free to contact us if you have any questions or need further assistance. See you next time and don't miss to bookmark.
