Exercise 9.5 Making A Topographic Map
Onlines
Mar 25, 2025 · 7 min read
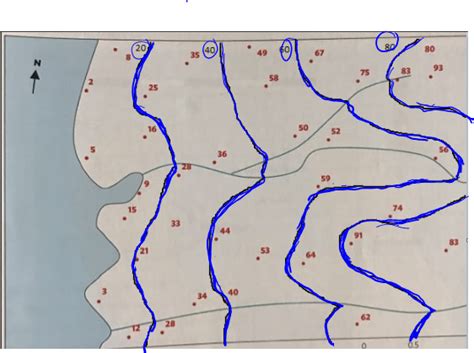
Table of Contents
Exercise 9.5: Making a Topographic Map – A Comprehensive Guide
Creating a topographic map might seem daunting, but with a systematic approach and the right tools, it becomes a manageable and rewarding exercise. This in-depth guide will walk you through the process of making a topographic map, covering everything from data acquisition to final map production. We’ll delve into the intricacies of contour lines, elevation representation, and map symbology, equipping you with the knowledge to create accurate and informative topographic maps.
Understanding Topographic Maps
Before diving into the creation process, let’s establish a clear understanding of what a topographic map is. A topographic map is a detailed representation of the Earth’s surface, showing both natural and man-made features, and most importantly, elevation. This elevation is typically illustrated using contour lines, which connect points of equal elevation. The closer the contour lines are together, the steeper the slope; the farther apart, the gentler the slope.
Key Elements of a Topographic Map:
- Contour Lines: The backbone of any topographic map. These lines represent points of equal elevation. Understanding contour line spacing is crucial for interpreting slope.
- Contour Interval: The vertical distance between consecutive contour lines. This interval is crucial for understanding the scale of elevation changes. A smaller contour interval provides more detail in areas with subtle changes in elevation.
- Index Contours: Thicker contour lines, usually labeled with their elevation value, making it easy to quickly read elevations across the map.
- Relief: The difference between the highest and lowest points on the map, providing context for the overall topography.
- Spot Elevations: Precise elevation points marked on the map, often for significant features like mountain peaks or valley bottoms.
- Map Symbols: Standardized symbols representing various features, such as roads, buildings, water bodies, vegetation, and other geographical details.
Data Acquisition: The Foundation of Your Map
The accuracy and quality of your topographic map directly depend on the quality of your data. There are several methods for acquiring elevation data:
1. Direct Measurement: Traditional Surveying
This traditional method involves using surveying instruments like theodolites and leveling instruments to precisely measure elevations at various points in the field. This method is highly accurate but time-consuming and labor-intensive, making it suitable for small-scale projects or when utmost precision is required. Careful record-keeping and meticulous measurements are paramount.
2. Digital Elevation Models (DEMs): Utilizing Existing Data
DEMs are digital representations of the Earth's terrain. Numerous sources offer freely accessible DEM data, including government agencies and online repositories. These datasets often come in various formats, such as raster (grids of elevation values) or vector (points and lines representing elevation). While convenient, it's crucial to check the data's resolution and accuracy to ensure it meets your needs. Lower resolutions might lack detail in rugged terrain.
3. GPS and GNSS: Modern Surveying Techniques
Global Positioning Systems (GPS) and Global Navigation Satellite Systems (GNSS) offer a more efficient way to collect elevation data. Handheld GPS devices or more sophisticated GNSS receivers can record precise locations and elevations. Post-processing the GPS data using specialized software can further refine the accuracy. This method is quicker than traditional surveying and offers good accuracy for many applications.
Mapping Techniques: Bringing Your Data to Life
Once you’ve gathered your elevation data, you need to transform it into a visual representation. Several methods exist for creating your topographic map:
1. Manual Contouring: The Classic Approach
This method involves manually drawing contour lines onto a base map using the collected elevation data. You'll start by identifying points of equal elevation and then connect them smoothly to create the contour lines. This process requires a steady hand, patience, and a strong understanding of contour line principles. It offers a deep understanding of the data but is time-consuming and can be prone to inaccuracies, particularly with large datasets.
2. Computer-Assisted Mapping: Using GIS Software
Geographic Information Systems (GIS) software provides powerful tools for creating topographic maps. Software such as ArcGIS, QGIS (open-source), and others allow you to import your elevation data (either from DEMs or your own measurements), automatically generate contour lines, and add other map features. GIS software offers flexibility, allowing you to easily manipulate the contour interval, adjust the appearance of the map, and add labels and symbols. This is the preferred method for larger and more complex projects.
3. Contouring using specialized Software:
Specific software packages are designed for creating topographic maps and offer advanced features tailored to this task. These often integrate functionalities such as 3D visualization, profile analysis, and data interpolation, enhancing accuracy and efficiency in generating contour lines.
Map Symbology and Annotation: Communicating Effectively
A well-designed topographic map doesn’t just display elevation; it effectively communicates information. Proper symbology and annotation are critical for clear understanding.
1. Choosing a suitable Scale:
The scale of your map determines the level of detail. A larger scale map shows finer details but covers a smaller area. Conversely, a smaller scale map covers a broader area but with less detail.
2. Consistent Contour Line Styles:
Maintain consistency in the thickness and style of your contour lines (index contours, intermediate contours). This improves readability.
3. Clear and Concise Labeling:
Clearly label index contours with their elevation values. Use a consistent font and size.
4. Effective Use of Symbols:
Employ standardized map symbols to represent geographical features consistently. A legend should clearly explain the meaning of all symbols used.
5. North Arrow and Scale Bar:
Always include a north arrow indicating the direction of north and a scale bar showing the map's scale.
6. Title and Metadata:
Provide a clear and concise title for your map. Include metadata, such as the date of creation, data sources, and any relevant information.
Advanced Techniques and Considerations:
- Interpolation: Techniques used to estimate elevation values between known points, particularly useful when data points are sparsely distributed.
- Hillshading: A technique that adds visual depth and relief to the map by simulating the way light falls on the terrain.
- Hypsometric Tinting: Coloring the map based on elevation, adding another dimension of visual interpretation.
- 3D Visualization: Software can create 3D models of the terrain, providing a more immersive view of the topography.
- Data Accuracy and Error Propagation: Always consider the accuracy of your source data and potential sources of error during the mapping process.
Exercise 9.5: A Practical Approach
Let's outline a step-by-step approach to complete Exercise 9.5, focusing on utilizing both manual and digital techniques.
Step 1: Define the Area: Select a relatively small area for your map to manage the data efficiently. A park, a school campus, or a small neighborhood are suitable choices.
Step 2: Data Acquisition: For a small area, direct measurement using a simple altimeter or a clinometer might suffice. Alternatively, use freely available DEM data of the chosen area.
Step 3: Data Processing (If using DEM): Import your DEM data into GIS software. Familiarize yourself with its tools and functionalities.
Step 4: Contour Line Generation: Use the software's contouring tool to generate contour lines, adjust the contour interval to suit your needs.
Step 5: Manual Verification (Optional): For a more hands-on experience, manually verify a section of the generated contour lines to understand how the software interprets the data.
Step 6: Adding Map Features: Digitize or import features like roads, buildings, and water bodies.
Step 7: Symbology and Annotation: Add a title, legend, scale bar, north arrow, and any additional annotations. Ensure all symbols and labels are clearly defined and consistent.
Step 8: Final Output: Export your map in a suitable format (e.g., PDF, image).
Conclusion: Master of Your Topographic Map
Creating a topographic map is a journey that blends field work, data analysis, and cartographic skills. Whether you choose a manual or digital approach, understanding the underlying principles of contour lines, elevation representation, and map symbology is paramount. By following the steps outlined above and leveraging the power of GIS software, you can effectively transform your elevation data into a clear, informative, and visually appealing topographic map. Remember, practice makes perfect, so don’t hesitate to experiment and refine your techniques to become a master of topographic map-making.
Latest Posts
Latest Posts
-
Themes In The Hunchback Of Notre Dame
Mar 26, 2025
-
Han Tratado De Llevar Una Vida Sana Roberto Y Miguel
Mar 26, 2025
-
If Wxyz Is A Square Find Each Angle
Mar 26, 2025
-
Sense And Sensibility Chapter 1 Summary
Mar 26, 2025
-
Summary Sweat By Zora Neale Hurston
Mar 26, 2025
Related Post
Thank you for visiting our website which covers about Exercise 9.5 Making A Topographic Map . We hope the information provided has been useful to you. Feel free to contact us if you have any questions or need further assistance. See you next time and don't miss to bookmark.
