Lab Activity Weather Instruments Answer Key
Onlines
Mar 10, 2025 · 7 min read
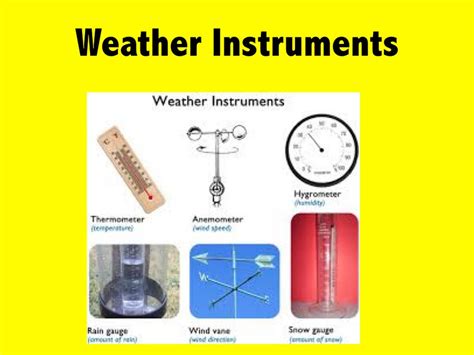
Table of Contents
Lab Activity: Weather Instruments – Answer Key & Comprehensive Guide
This comprehensive guide serves as an answer key and detailed explanation for a typical lab activity focused on weather instruments. It's designed to help students understand the function, operation, and limitations of various tools used in meteorology. We will cover the principles behind each instrument, potential sources of error, and how to accurately interpret the collected data. This guide aims to solidify your understanding and provide a deeper insight into the fascinating world of weather observation.
Section 1: Introduction to Weather Instruments
Weather instruments are crucial tools for collecting meteorological data, which are essential for understanding atmospheric conditions, predicting weather patterns, and monitoring climate change. Accurate data collection and interpretation are paramount. This section introduces the key instruments used in the typical lab activity.
1.1 Thermometer: Measuring Temperature
The thermometer is a fundamental instrument used to measure air temperature. Different types exist, including:
- Liquid-in-glass thermometers: These rely on the expansion and contraction of a liquid (usually mercury or alcohol) within a glass tube. Important considerations: Ensure the thermometer is shaded from direct sunlight to get accurate readings. Read the level of the liquid at eye level to avoid parallax error.
- Digital thermometers: These use electronic sensors to measure temperature and display it digitally. Important considerations: Ensure the thermometer is properly calibrated. Battery life should be checked.
Answer Key Example: A liquid-in-glass thermometer shows the liquid level at 25°C. This is the measured air temperature.
1.2 Barometer: Measuring Air Pressure
Barometers measure atmospheric pressure, which is the weight of the air above a given point. Two common types are:
- Mercury barometer: A classic instrument where atmospheric pressure supports a column of mercury. Important considerations: Mercury is a hazardous substance, and these barometers require careful handling. Changes in altitude significantly impact readings.
- Aneroid barometer: A more portable instrument that uses an airtight metal box that expands and contracts with changes in atmospheric pressure. Important considerations: These instruments should be calibrated regularly. Readings should be adjusted for altitude.
Answer Key Example: An aneroid barometer reads 1012 millibars (mb). This indicates a relatively high atmospheric pressure.
1.3 Hygrometer: Measuring Humidity
Hygrometers measure the amount of water vapor in the air, expressed as relative humidity (%). Two main types are:
- Hair hygrometer: This uses human hair's property of lengthening and shortening with changes in humidity. Important considerations: Human hair is susceptible to stretching and damage over time, impacting its accuracy. Calibration is essential.
- Psychrometer (sling psychrometer): This consists of two thermometers: a dry-bulb and a wet-bulb thermometer. The difference in readings between the two thermometers is used to determine relative humidity using a psychrometric chart. Important considerations: Proper swinging technique is essential for accurate wet-bulb readings. Air should be freely circulating.
Answer Key Example: A sling psychrometer yields a dry-bulb temperature of 22°C and a wet-bulb temperature of 18°C. Using a psychrometric chart, the relative humidity can be determined. (The specific humidity value would depend on the chart used.)
1.4 Anemometer: Measuring Wind Speed
Anemometers measure wind speed. The most common type is a cup anemometer, which uses rotating cups to measure wind speed. Important considerations: Ensure the anemometer is placed in an open area, away from obstructions, to get an accurate representation of wind speed. Readings should be taken over a period of time to account for wind gusts.
Answer Key Example: A cup anemometer registers a wind speed of 15 kilometers per hour (km/h).
1.5 Wind Vane: Measuring Wind Direction
Wind vanes indicate wind direction. They work by rotating to align themselves with the prevailing wind. Important considerations: Similar to the anemometer, it must be placed in an unobstructed location for accurate readings.
Answer Key Example: A wind vane points towards the north-west.
1.6 Rain Gauge: Measuring Rainfall
Rain gauges measure the amount of rainfall over a specific period. They come in various designs, but the basic principle is to collect and measure the volume of rain. Important considerations: The gauge should be placed in a level position, away from obstructions that could affect rainfall collection. The collected water should be measured carefully and recorded accurately.
Answer Key Example: A rain gauge shows a rainfall accumulation of 10 millimeters (mm) over a 24-hour period.
Section 2: Lab Activity Procedures and Data Analysis
This section details common procedures followed in a weather instruments lab activity and guides you through data analysis.
2.1 Procedure Example: Measuring Temperature and Humidity
- Set up: Place a liquid-in-glass thermometer and a sling psychrometer in a shaded area, ensuring good air circulation around the instruments.
- Reading Temperature: Observe the liquid-in-glass thermometer and record the temperature in degrees Celsius (°C).
- Reading Humidity: Swing the sling psychrometer for a few minutes, ensuring proper technique. Record the dry-bulb and wet-bulb temperatures.
- Data Analysis: Use a psychrometric chart to determine the relative humidity (%) using the recorded dry-bulb and wet-bulb temperatures.
2.2 Procedure Example: Measuring Wind Speed and Direction
- Set up: Position the anemometer and wind vane in an open area, free from obstructions.
- Reading Wind Speed: Observe the anemometer readings and record the average wind speed in kilometers per hour (km/h) over a 5-minute period.
- Reading Wind Direction: Observe the wind vane and record the direction from which the wind is blowing (e.g., North, South, East, West, or using degrees).
2.3 Data Analysis and Interpretation
This is where you make sense of your observations. The following steps will help:
- Organization: Create a table to organize your data neatly. Include columns for date, time, instrument used, and the recorded measurement.
- Calculations: For instruments requiring calculations (e.g., psychrometer), show your working and clearly state the calculated value.
- Interpretation: Analyze your data in the context of the weather conditions. Relate your findings to the concepts learned during the activity. For instance, high atmospheric pressure might correlate with fair weather.
Section 3: Sources of Error and Mitigation Strategies
Accurately measuring weather parameters requires careful attention to detail. Various factors can introduce errors in your readings.
3.1 Instrumental Errors
- Calibration: Instruments may drift out of calibration over time. Regular calibration is essential for accuracy.
- Maintenance: Neglecting instrument maintenance can affect accuracy (e.g., dirty rain gauge).
- Sensor Issues: Electronic sensors in digital instruments can malfunction.
3.2 Observational Errors
- Parallax error: Incorrectly reading a scale due to an improper viewing angle.
- Human error: Mistakes in recording data, using instruments improperly.
- Environmental factors: Sunlight affecting thermometer readings, wind affecting anemometer measurements.
3.3 Mitigation Strategies
- Calibration: Ensure instruments are properly calibrated before each use.
- Proper technique: Use instruments correctly according to instructions.
- Multiple readings: Take multiple readings and calculate the average to reduce random errors.
- Control variables: Minimize the influence of extraneous variables (e.g., shade thermometers from direct sunlight).
- Data validation: Check for inconsistencies in your data and identify potential errors.
Section 4: Expanding Your Knowledge
Understanding weather instruments is just the beginning. Explore these concepts to further enhance your understanding:
- Weather maps and charts: Learn how to interpret meteorological maps and charts, which utilize data from various weather instruments.
- Meteorological models: Investigate the use of computer models in weather prediction.
- Climate change: Explore how weather data contributes to our understanding of climate change.
- Advanced instruments: Research more sophisticated weather instruments like Doppler radar and satellites.
Conclusion
This guide serves as a comprehensive resource for understanding the operation and application of common weather instruments. Remember that accuracy and careful observation are crucial in meteorology. By mastering the principles outlined in this guide, you can significantly improve your ability to collect, analyze, and interpret weather data, paving the way for a deeper understanding of atmospheric science. By understanding the potential sources of error and employing appropriate mitigation strategies, you can contribute to more reliable and accurate weather observations. The field of meteorology is continuously evolving, so continued learning and exploration are encouraged.
Latest Posts
Latest Posts
-
Gumuhit Ng Isang Larawan Na Nagpapakita Ng Kaugaliang Pilipino
Mar 10, 2025
-
To Avoid Fatigue When Should Team Roles Alternate Providing Compressions
Mar 10, 2025
-
To Kill A Mockingbird Summary Each Chapter
Mar 10, 2025
-
Unit 6a The Nature Of Waves Practice Problems Answer Key
Mar 10, 2025
-
Nos Van A Servir El Cafe
Mar 10, 2025
Related Post
Thank you for visiting our website which covers about Lab Activity Weather Instruments Answer Key . We hope the information provided has been useful to you. Feel free to contact us if you have any questions or need further assistance. See you next time and don't miss to bookmark.
