Label The Structures On This Tissue Slide
Onlines
Mar 25, 2025 · 5 min read
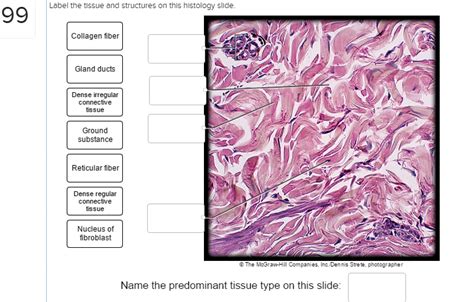
Table of Contents
Labeling Structures on a Tissue Slide: A Comprehensive Guide
Identifying structures on a tissue slide is a fundamental skill in histology, pathology, and many biological sciences. This process requires a keen eye for detail, a solid understanding of tissue organization, and familiarity with common staining techniques. This comprehensive guide will walk you through the process, focusing on effective strategies, common challenges, and best practices for accurate labeling.
Understanding Tissue Slides and Staining Techniques
Before we delve into labeling, it's crucial to understand the foundation: tissue slides themselves. A tissue slide is a thin section of biological tissue mounted on a glass slide and stained to enhance visibility of its structures. The staining technique dramatically impacts the appearance of different tissues and cellular components.
Common Staining Techniques and Their Effects:
-
Hematoxylin and Eosin (H&E): This is the most common stain used in histology. Hematoxylin stains nuclei a dark purple or blue, while eosin stains the cytoplasm pink or red. This differential staining allows for easy identification of cells and their components.
-
Periodic Acid-Schiff (PAS): PAS stains carbohydrates, such as glycogen and mucus, a magenta color. This is particularly useful for identifying connective tissues and certain types of epithelial cells.
-
Trichrome stains (e.g., Masson's Trichrome): These stains differentiate collagen fibers (green or blue), muscle fibers (red), and nuclei (black or brown). They are valuable for identifying different components of connective tissue.
-
Immunohistochemistry (IHC): IHC uses antibodies to target specific proteins within the tissue. The antibodies are then visualized using a chromogen, allowing for the identification of specific cell types or markers.
Essential Tools for Labeling Tissue Slides
Accurate labeling requires the right tools. These include:
-
High-quality microscope: A microscope with good resolution and magnification is essential for visualizing fine details within the tissue.
-
Microscope slides: Clean, high-quality microscope slides are needed to ensure clear viewing.
-
Microscope objectives: A range of objectives (e.g., 4x, 10x, 20x, 40x, 100x oil immersion) allows for viewing at different magnifications.
-
Permanent marker: A fine-tipped permanent marker is ideal for labeling slides.
-
Ruler or scale bar: For accurate measurements and scale representation in drawings or images.
-
Histology textbook or atlas: A reliable histology resource is invaluable for referencing structures and comparing your observations.
Step-by-Step Guide to Labeling Tissue Slides
The process of labeling tissue slides involves careful observation, systematic identification, and precise annotation. Follow these steps for optimal results:
1. Initial Observation at Low Magnification (4x-10x):
Begin by examining the slide at low magnification. This gives you an overview of the tissue architecture, allowing you to identify major regions and tissue types. Note the overall organization – is it epithelial, connective, muscle, or nervous tissue? Look for distinct layers, regions, or structures.
2. Systematic Examination at Higher Magnification (20x-40x):
Once you have a general understanding, switch to higher magnifications. Systematically scan the slide, focusing on individual cells and cellular components. Look for characteristic features such as cell shape, size, arrangement, and staining properties.
3. Identification of Key Structures:
This is where your knowledge of histology comes into play. Identify specific structures based on their morphology and staining characteristics. Some common structures to look for include:
-
Epithelial tissue: Identify the type of epithelium (e.g., stratified squamous, simple columnar, pseudostratified), note the presence of cilia, goblet cells, or microvilli.
-
Connective tissue: Identify different types of connective tissue (e.g., loose connective tissue, dense regular connective tissue, adipose tissue, cartilage, bone). Look for characteristic fibers (collagen, elastic, reticular) and cells (fibroblasts, chondrocytes, osteocytes).
-
Muscle tissue: Differentiate between skeletal, smooth, and cardiac muscle. Note the striations in skeletal and cardiac muscle, the presence of intercalated discs in cardiac muscle, and the lack of striations in smooth muscle.
-
Nervous tissue: Identify neurons, neuroglia, axons, and dendrites. Note the characteristic shapes and staining properties of these cells.
4. Precise Labeling:
Once you have identified the structures, carefully label them on your drawing or digital image. Use clear and concise labels, avoiding ambiguity. Ensure that your labels are directly connected to the structure they represent.
5. Include a Scale Bar:
Adding a scale bar provides context for the size of structures shown. This is crucial for accurate interpretation and comparison.
6. Detailed Description:
Supplement your labeling with a brief description of the tissue and its key features. This description should include the type of tissue, its arrangement, and any notable cellular components or specializations.
Common Challenges and Troubleshooting Tips
Labeling tissue slides can be challenging. Here are some common problems and solutions:
-
Difficulty distinguishing between similar structures: Use multiple magnification levels and refer to histological atlases or textbooks. Pay close attention to subtle differences in cell shape, size, and staining patterns.
-
Artifacts: Artifacts (e.g., folds, tears, debris) can mimic actual tissue structures. Learn to identify common artifacts to avoid misinterpretation.
-
Poor staining: Poorly stained slides can make identification difficult. If the staining is suboptimal, consult with a laboratory technician or experienced histologist.
-
Unfamiliarity with tissue types: Develop a strong foundation in histology by studying textbooks, atlases, and online resources. Practice labeling slides regularly.
Advanced Techniques and Considerations
For more advanced applications, consider these techniques:
-
Digital image analysis: Software programs can assist in the quantification and analysis of tissue structures.
-
Image editing software: Image editing tools can enhance the visibility of specific structures, making labeling easier.
-
Microscopy techniques beyond bright-field: Specialized microscopy techniques (e.g., fluorescence microscopy, electron microscopy) provide more detailed information about tissue structure and composition.
Conclusion: Mastering the Art of Tissue Slide Labeling
Successfully labeling structures on a tissue slide requires a blend of theoretical knowledge, practical skills, and attention to detail. By following the steps outlined in this guide and practicing regularly, you can develop the expertise needed for accurate and reliable interpretation of histological specimens. Remember, consistent practice and diligent observation are key to mastering this essential skill. This will not only improve your understanding of histology but also contribute to accurate diagnosis and research in fields relying on histological analysis. The ability to precisely label and interpret tissue slides is a valuable asset in various scientific and medical disciplines.
Latest Posts
Latest Posts
-
Chapter 11 Summary Lord Of The Flies
Mar 28, 2025
-
Final Exam For Is 100 C Answers
Mar 28, 2025
-
James Stewart Calculus 8th Edition Solutions Pdf
Mar 28, 2025
-
Summary Chapter 2 To Kill A Mockingbird
Mar 28, 2025
-
Chapter 18 Summary Of The Giver
Mar 28, 2025
Related Post
Thank you for visiting our website which covers about Label The Structures On This Tissue Slide . We hope the information provided has been useful to you. Feel free to contact us if you have any questions or need further assistance. See you next time and don't miss to bookmark.
