Software Lab Simulation 12-2 Install Hyper-v Configure And Create Vm
Onlines
Mar 15, 2025 · 7 min read
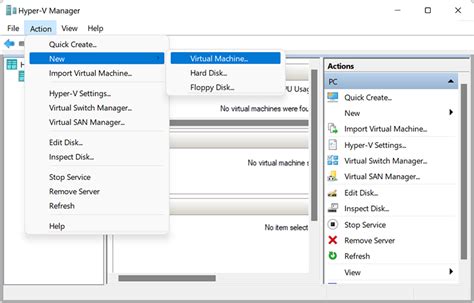
Table of Contents
Software Lab Simulation: Installing Hyper-V, Configuring, and Creating a VM (12-2)
This comprehensive guide walks you through the process of setting up a software lab simulation using Hyper-V, a powerful virtualization tool built into Windows. We'll cover the installation of Hyper-V, its configuration, and the creation of a virtual machine (VM), providing detailed steps and explanations to ensure a smooth and successful experience. This detailed tutorial is perfect for students, system administrators, and anyone looking to build their own virtual lab environment for testing, development, or learning purposes.
Prerequisites
Before we begin, ensure you meet the following requirements:
- A Windows system that supports Hyper-V: Hyper-V is available on most 64-bit versions of Windows 10 and Windows Server. Check your system's specifications to confirm compatibility. Older systems may require a BIOS upgrade to support virtualization features.
- Administrator privileges: You'll need administrator rights to install and configure Hyper-V.
- Sufficient disk space: Allocate ample disk space for the Hyper-V installation and the virtual machines you'll create. The amount of space needed depends on the operating systems and applications you intend to run within the VMs. Consider at least 50GB to start, but more is always better.
- Basic understanding of virtualization concepts: While this guide will walk you through the steps, familiarity with virtual machines and their functionalities will be beneficial.
Step 1: Enabling Hyper-V
The first step is to enable the Hyper-V role within your Windows system. This process varies slightly depending on your Windows version.
Enabling Hyper-V in Windows 10
- Open Control Panel: Search for "Control Panel" in the Windows search bar and open it.
- Navigate to Programs and Features: Click on "Programs and Features."
- Turn Windows features on or off: In the left-hand pane, click on "Turn Windows features on or off."
- Enable Hyper-V: Scroll down the list, find "Hyper-V," and check the box next to it. This will usually select several sub-features automatically. Click "OK."
- Restart your computer: A system restart is necessary to complete the installation of Hyper-V.
Enabling Hyper-V in Windows Server (e.g., Windows Server 2019, 2022)
The process is very similar in Windows Server, although the interface might look slightly different. You can utilize the Server Manager or PowerShell.
Using Server Manager:
- Open Server Manager.
- Click Add roles and features.
- Follow the wizard, selecting Role-based or feature-based installation.
- Choose your target server.
- Select Hyper-V from the available roles.
- Follow the prompts to complete the installation and restart the server.
Using PowerShell:
Open PowerShell as an administrator and run the following command:
Enable-WindowsOptionalFeature -Online -FeatureName Microsoft-Hyper-V -All
This command enables all Hyper-V features. After execution, restart your server.
Step 2: Configuring Hyper-V Manager
Once Hyper-V is installed and your system has restarted, you'll need to familiarize yourself with Hyper-V Manager, the primary interface for managing your virtual machines.
- Open Hyper-V Manager: Search for "Hyper-V Manager" in the Windows search bar and open it.
- Understanding the Interface: Hyper-V Manager displays a list of your virtual machines. Initially, this list will be empty. The right-hand pane provides options to manage individual VMs once you create them.
Step 3: Creating a Virtual Machine
Now comes the exciting part – creating your first virtual machine!
-
New Virtual Machine: In Hyper-V Manager, click "New" -> "Virtual Machine."
-
Before You Begin: Before proceeding, it's crucial to decide on the following:
- Operating System: What operating system will your VM run (e.g., Windows 10, Windows Server 2022, Ubuntu, CentOS)? You'll need the appropriate ISO image file.
- Generation: Choose between Generation 1 and Generation 2 VMs. Generation 2 VMs offer better security and support for UEFI (Unified Extensible Firmware Interface), but they're not compatible with all older operating systems. Generation 1 is often preferred for legacy OS installations.
- Resource Allocation: How much RAM, processor cores, and hard disk space will you allocate to your VM? This depends on the intended workload. A balance is key; over-allocating resources is wasteful, while under-allocating can lead to performance issues.
-
Name and Location: Give your VM a descriptive name and choose a location for its virtual hard disk files. This is often best kept organized on a separate partition or drive dedicated to virtual machines.
-
Generation: Select the VM generation (1 or 2) based on your operating system choice. For most modern OS installations, Generation 2 is recommended.
-
Memory: Assign the amount of RAM. Start with a reasonable amount, depending on the OS and applications you plan to run. 4GB is a good starting point for many Windows installations.
-
Processor: Allocate virtual processors (cores). Again, this depends on your workload. One core is generally sufficient for basic testing, but you may need more for demanding tasks.
-
Network: Choose a network adapter. This allows your VM to connect to your network. The options will usually include a default switch that connects the VM to your physical network. You can also create new virtual switches for more isolated network configurations.
-
Hard Drive: Select "Create a virtual hard disk." Choose a size and type. The type (Dynamically Expanding, Fixed Size) affects storage management. A dynamically expanding disk only uses space as needed, while a fixed size allocates the entire space upfront.
-
Installation Media: Browse to the location of your operating system's ISO image file. This is necessary for the installation process.
-
Install the Operating System: After confirming all settings, Hyper-V will begin the VM creation process. Once completed, you'll be prompted to begin installing the operating system within the new virtual machine.
-
Post-Installation Configuration: After installing the OS within the VM, you'll need to configure it further: install necessary software, update drivers, configure network settings, etc.
Advanced Hyper-V Configuration
Beyond the basic setup, Hyper-V offers numerous advanced configuration options.
- Virtual Switch Manager: Allows for creating and managing different virtual switches, providing various levels of network isolation and connectivity for your VMs.
- Resource Allocation: Fine-grained control over CPU, memory, and network resource allocation for individual VMs.
- Snapshots: Taking snapshots of your VMs allows for rolling back to previous states, useful for testing and troubleshooting.
- Live Migration: Moving running VMs between Hyper-V hosts without downtime. This requires appropriate network configuration.
- Replication: Replicating VMs to another Hyper-V host for high availability and disaster recovery.
Troubleshooting Common Issues
- Hyper-V not installed: Ensure you've followed the steps correctly to enable Hyper-V in Windows. A restart is required after enabling it.
- Insufficient Resources: Allocate more RAM, CPU cores, or disk space to your VM if it's experiencing performance issues.
- Network Connectivity Problems: Check your virtual switch settings and ensure your VM is correctly connected to a network.
- Operating System Installation Failures: Double-check that you're using a valid ISO image file and that your VM settings are compatible with your OS.
Best Practices for Software Lab Simulation using Hyper-V
- Organize your VMs: Keep your virtual machines logically organized, perhaps using naming conventions and dedicated storage locations.
- Regular Snapshots: Take regular snapshots to easily revert to a known working state.
- Resource Monitoring: Monitor the resource usage of your VMs to identify and resolve performance bottlenecks.
- Security: Maintain appropriate security measures within your VMs, just as you would on physical machines. Keep the OS and applications up-to-date.
- Documentation: Keep detailed documentation of your VM configurations, settings, and any modifications made.
Conclusion
Setting up a software lab simulation using Hyper-V is a powerful way to create a flexible and cost-effective environment for testing, development, and learning. This comprehensive guide has provided a step-by-step approach to setting up your own virtual lab environment, equipping you with the knowledge to build and manage VMs effectively. Remember to explore the advanced features of Hyper-V and employ best practices to maximize the efficiency and security of your software lab. This will enable you to focus on your projects and learning without the limitations of physical hardware constraints. By following these steps and tips, you can create a robust and reliable virtual lab environment to support your technical endeavors. Happy virtualizing!
Latest Posts
Latest Posts
-
Central Dogma And Genetic Medicine Answer Key
Mar 15, 2025
-
Two Sisters Two Plans Answer Key
Mar 15, 2025
-
A Vindication Of The Rights Of Woman Quotes
Mar 15, 2025
-
Mass Production Focuses On Producing Blank
Mar 15, 2025
-
Hitchhikers Guide To The Galaxy Chapter Summary
Mar 15, 2025
Related Post
Thank you for visiting our website which covers about Software Lab Simulation 12-2 Install Hyper-v Configure And Create Vm . We hope the information provided has been useful to you. Feel free to contact us if you have any questions or need further assistance. See you next time and don't miss to bookmark.
