3.3.7 Choose And Install A Motherboard
Onlines
Mar 15, 2025 · 7 min read
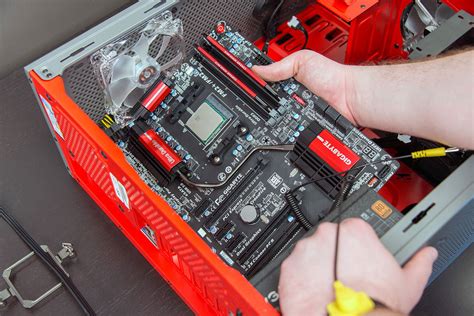
Table of Contents
3.3.7 Choosing and Installing a Motherboard: A Comprehensive Guide
Choosing and installing a motherboard might seem daunting, but with a methodical approach and the right information, it's a manageable process. This comprehensive guide will walk you through every step, from selecting the perfect motherboard for your needs to securely installing it in your computer case. We’ll cover crucial considerations like compatibility, features, and the installation process itself, ensuring you build a stable and reliable PC.
Understanding Motherboard Fundamentals
Before diving into the selection and installation, let's solidify our understanding of what a motherboard is and why it's so crucial. The motherboard, also known as the mainboard or system board, is the central printed circuit board (PCB) in your computer. It's the backbone of your entire system, connecting all the essential components. Think of it as the city's infrastructure – roads, power grids, and communication networks – all working together to make the city function. Similarly, the motherboard connects the CPU, RAM, storage devices, graphics card, and other peripherals.
Key Motherboard Components:
- CPU Socket: This is the physical slot where the central processing unit (CPU) is installed. Different CPUs require different sockets, making this a crucial compatibility factor.
- RAM Slots: These slots accommodate Random Access Memory (RAM) modules, which provide short-term storage for the CPU to access data quickly. The number and type of RAM slots will impact your system's performance and upgradeability.
- Expansion Slots: These slots, typically PCI Express (PCIe) slots, allow you to install expansion cards like graphics cards, sound cards, and network interface cards. The number and types of PCIe slots will determine the expandability of your system.
- Chipset: The chipset is a collection of integrated circuits that manage communication between the CPU, RAM, and other components. The chipset significantly influences the motherboard's capabilities and overall performance.
- BIOS/UEFI: The Basic Input/Output System (BIOS) or Unified Extensible Firmware Interface (UEFI) is a firmware that initializes the computer hardware and loads the operating system.
- Storage Connectors: These include SATA ports for hard drives and solid-state drives (SSDs), and potentially NVMe M.2 slots for high-speed SSDs.
- I/O Panel: Located at the rear of the motherboard, the I/O panel houses ports for connecting peripherals like USB devices, audio jacks, Ethernet, and more.
Choosing the Right Motherboard: Factors to Consider
Choosing the right motherboard is paramount to building a successful PC. Here's a breakdown of the key considerations:
1. CPU Socket Compatibility:
This is the most critical factor. Your chosen motherboard must be compatible with your CPU. Intel and AMD use different sockets, and even within each brand, different generations of CPUs have different sockets. Check your CPU's specifications to determine the required socket type before selecting a motherboard.
2. Chipset:
The chipset influences the motherboard's features and capabilities. For example, higher-end chipsets often support more PCIe lanes, enabling faster data transfer speeds and supporting multiple high-performance graphics cards. Research different chipsets and choose one that aligns with your performance needs and budget.
3. RAM Compatibility:
Motherboards support specific types and amounts of RAM. Consider the type of RAM (DDR4 or DDR5), the maximum capacity, and the number of RAM slots. Ensure the motherboard supports the RAM you plan to use.
4. Expansion Slots:
Consider the number and type of expansion slots you need. If you plan to use a high-end graphics card, ensure the motherboard has a suitable PCIe slot (at least PCIe 3.0 x16 or PCIe 4.0 x16 for optimal performance). Also, consider other expansion needs like sound cards or network interface cards.
5. Storage Options:
Motherboards offer different storage options, including SATA ports and M.2 slots. SATA ports are more common and generally support a wider range of storage devices. M.2 slots are ideal for high-speed NVMe SSDs. Choose a motherboard with enough storage options to meet your requirements.
6. Form Factor:
Motherboards come in different sizes and shapes, known as form factors. The most common are ATX, Micro-ATX, and Mini-ITX. ATX is the largest and offers the most expansion possibilities, while Mini-ITX is the smallest and most compact. Choose a form factor that's compatible with your computer case.
7. Features:
Consider features like integrated Wi-Fi, Bluetooth, multiple USB ports, and audio capabilities. These features can add convenience and improve your system's overall functionality.
8. Budget:
Motherboards range in price from budget-friendly options to high-end models. Set a realistic budget and choose a motherboard that offers the features and performance you need without exceeding your budget.
Installing the Motherboard: A Step-by-Step Guide
Once you've chosen the right motherboard, it's time for the installation. This process requires care and attention to detail. Static electricity can damage components, so remember to ground yourself before handling any parts.
1. Preparing the Case:
- Open the Case: Carefully open your computer case, usually by removing side panels.
- Install Standoffs: Most cases include standoffs, small screws that elevate the motherboard above the case, preventing short circuits. Install these in the appropriate locations based on your motherboard's manual.
2. Installing the Motherboard:
- Align the Motherboard: Carefully align the motherboard over the standoffs.
- Secure the Motherboard: Gently press down on the motherboard to ensure it sits firmly on the standoffs. Screw it in place using the appropriate screws provided with the case. Don't overtighten the screws.
3. Connecting Components:
- CPU Installation: Install the CPU according to the motherboard's manual and the CPU's instructions. This usually involves carefully aligning the CPU with the socket and gently lowering it into place.
- CPU Cooler Installation: Attach the CPU cooler, ensuring proper thermal paste application for optimal heat dissipation.
- RAM Installation: Install the RAM modules into the appropriate slots, ensuring they click into place securely.
- Storage Devices: Connect your hard drives and SSDs to the SATA ports or M.2 slots.
- Graphics Card (if applicable): Insert the graphics card into the appropriate PCIe slot, making sure it clicks securely.
- Front Panel Connectors: Connect the front panel connectors (power button, reset button, USB ports, audio jacks, etc.) according to the motherboard's manual. This is often the most intricate part, requiring careful attention to detail.
- Power Supply: Connect the 24-pin ATX power connector and the 4/8-pin EPS power connector to the motherboard.
4. Connecting Peripherals:
- Connect other peripherals, such as your keyboard, mouse, monitor and other accessories to the appropriate ports on the rear I/O panel of the motherboard.
5. Initial Power On:
- Close the Case: Once all components are connected, close your computer case.
- Initial Boot: Connect the power cord and try to boot the computer. If everything is connected correctly, you should see the BIOS/UEFI screen.
Troubleshooting Common Issues:
- No Power: Check all power connections, including the power supply to the motherboard, and the power cord.
- No Display: Check the graphics card, monitor connection, and ensure the monitor is set to the correct input source. Also ensure the correct boot order is set in BIOS/UEFI.
- System Beeps: Different beep codes indicate different hardware issues. Consult your motherboard's manual to decode the beep codes.
- Overheating: Ensure proper airflow in the case and that the CPU cooler is working effectively. Monitor temperatures using monitoring software.
Conclusion:
Choosing and installing a motherboard is a crucial step in building a PC. By understanding the key factors in motherboard selection and carefully following the installation instructions, you can successfully build a reliable and high-performing computer. Remember to consult your motherboard’s manual for specific instructions and troubleshooting guidance. With patience and attention to detail, you’ll have your new PC up and running in no time. This comprehensive guide provides the foundation for a successful build, but remember to supplement this knowledge with specific instructions for your chosen motherboard and components. Happy building!
Latest Posts
Latest Posts
-
Genetic Science Learning Center Answer Key
Mar 15, 2025
-
Software Lab Simulation 12 2 Install Hyper V Configure And Create Vm
Mar 15, 2025
-
The Bible Is Most Adequately Described As
Mar 15, 2025
-
The Spirit That Catches You Sparknotes
Mar 15, 2025
-
Yo La Radio Por La Noche
Mar 15, 2025
Related Post
Thank you for visiting our website which covers about 3.3.7 Choose And Install A Motherboard . We hope the information provided has been useful to you. Feel free to contact us if you have any questions or need further assistance. See you next time and don't miss to bookmark.
