Advanced Hardware Lab 2-5 Select And Install A Motherboard
Onlines
Mar 30, 2025 · 8 min read
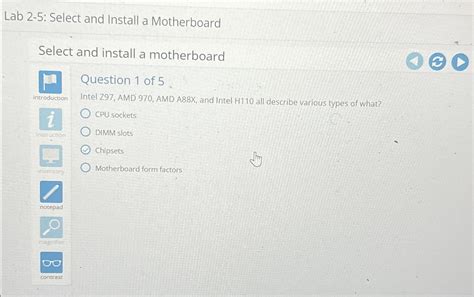
Table of Contents
Advanced Hardware Lab 2-5: Selecting and Installing a Motherboard
Choosing and installing a motherboard is a crucial step in building or upgrading a computer. This isn't simply a case of picking any board and slotting it in; careful consideration of compatibility, features, and the installation process itself is vital for a successful build. This comprehensive guide will take you through the complexities of selecting the right motherboard for your needs and installing it correctly, ensuring a stable and high-performing system.
Understanding Motherboard Form Factors and Chipsets
Before diving into specific component choices, understanding the fundamental characteristics of motherboards is paramount. Two key aspects to grasp are the form factor and the chipset.
Motherboard Form Factors: Size Matters
The form factor dictates the physical dimensions and layout of the motherboard. Common form factors include:
- ATX (Advanced Technology Extended): The most common standard, offering ample space for expansion slots and components. Excellent for full-tower and mid-tower cases.
- Micro-ATX (mATX): A smaller version of ATX, suitable for smaller cases and systems with fewer expansion needs.
- Mini-ITX (ITX): The smallest form factor, ideal for compact builds and HTPCs (Home Theater PCs). Offers limited expansion capabilities.
- E-ATX (Extended ATX): Larger than standard ATX, providing extra space for more expansion slots and components, usually found in high-end workstations or servers.
Choosing the right form factor directly depends on your case's size and your planned expansions. Ensure the motherboard you choose is compatible with your case. Failing to do so will lead to incompatibility issues.
Chipsets: The Brains of the Operation
The chipset acts as the communication hub between the CPU, RAM, storage devices, and expansion slots. It dictates the supported CPU socket type, RAM type (DDR4, DDR5 etc.), and the number of PCIe lanes and SATA ports. Different chipsets offer varying levels of performance and features. Understanding your CPU choice is critical here, as the chipset must be compatible with your CPU. For instance, Intel's Z790 chipset offers high-end features and overclocking capabilities, while B760 offers a more balanced approach. Similarly, AMD offers various chipsets like X670E, B650, and X570, each catering to different needs and budgets. Research thoroughly to find the chipset that best suits your processor and planned usage.
Selecting the Right Motherboard: Key Considerations
With the fundamentals covered, let's delve into the crucial factors to consider when selecting a motherboard:
1. CPU Socket Compatibility: The Foundation
This is arguably the most important factor. The motherboard must have a socket that's compatible with your chosen CPU. Intel and AMD use different sockets, and even within each brand, different generations of processors require different sockets. Double-check the CPU socket type on both the motherboard specifications and the CPU packaging to avoid costly mistakes.
2. RAM Compatibility: Memory Matters
Motherboards support specific types and amounts of RAM. Ensure the motherboard supports the RAM type (DDR4, DDR5) and speed you intend to use. Check the motherboard specifications for the maximum supported RAM capacity and number of slots. Overlooking this can severely limit your system's performance.
3. Expansion Slots: Future-Proofing Your System
Consider the number and types of expansion slots available. This includes PCIe slots for graphics cards, sound cards, network cards, and other expansion devices. The number of PCIe lanes available also affects performance. More PCIe lanes generally mean better bandwidth, crucial for high-end graphics cards and other demanding devices. M.2 slots for NVMe SSDs are also becoming increasingly important, providing significantly faster storage speeds.
4. Storage Connectivity: Ample Space
Consider the number and type of storage interfaces the motherboard offers. SATA ports are standard for traditional HDDs and SSDs, while M.2 slots are ideal for NVMe SSDs. The number of SATA ports and M.2 slots will determine the number of storage devices you can connect. Consider your storage needs – both current and future – when making your selection.
5. Integrated Peripherals: Built-in Functionality
Many motherboards integrate audio, network, and even Wi-Fi capabilities. Consider whether you need these integrated features, or if you prefer to use dedicated cards for better performance or specific functionalities. This can impact your budget and the overall complexity of your build.
6. BIOS and UEFI: The System's Bootloader
The BIOS (Basic Input/Output System) or UEFI (Unified Extensible Firmware Interface) is the system's firmware. UEFI is the newer standard, offering advantages like better boot times and larger drive support. While most modern motherboards use UEFI, it's worth checking. Consider whether your chosen motherboard supports the latest UEFI features.
7. Overclocking Capabilities: Pushing the Limits
If you plan to overclock your CPU or RAM, ensure the motherboard supports it. Motherboards designed for overclocking typically have more robust power delivery systems and advanced BIOS settings. This generally means a higher price point. Only overclock if you are comfortable with the risks and understand the process.
8. Form Factor Compatibility: Case Consideration
The motherboard's form factor must be compatible with your chosen case. Double-check the case specifications to ensure the motherboard will fit correctly. Incorrect form factor selection will render the motherboard unusable.
9. Budget: Balancing Features and Cost
Motherboards range significantly in price. Set a budget before you start your search to avoid exceeding your spending limits. Prioritize the features that are most important to you and find a motherboard that offers the best balance of features and price.
Installing the Motherboard: A Step-by-Step Guide
With the motherboard selected, the installation process begins. Remember to follow the instructions specific to your motherboard and case. The following steps are a general guideline:
1. Preparing the Case and Components
- Ground Yourself: Use an anti-static wrist strap to prevent electrostatic discharge (ESD) from damaging sensitive components.
- Open the Case: Open your computer case and carefully place it on a stable, flat surface.
- Prepare the Standoffs: Most cases come with standoffs that elevate the motherboard above the case's bottom panel, preventing short circuits. Ensure these are correctly positioned before placing the motherboard.
- Gather Necessary Tools: You'll need a Phillips head screwdriver and possibly anti-static bags for protecting components.
2. Positioning the Motherboard
- Carefully Align the Motherboard: Align the motherboard over the standoffs, ensuring it sits correctly and is not forced into position.
- Secure the Motherboard: Gently lower the motherboard onto the standoffs. Screw the motherboard into place using the provided screws.
3. Installing the CPU (If Necessary):
- Consult the CPU's Manual: Refer to the CPU's manual for precise instructions on installing it into the motherboard socket.
- Careful Handling: CPUs are delicate. Handle them with care to prevent damage.
- Secure the CPU: Use the provided lever or bracket to securely fasten the CPU into the socket.
4. Installing the CPU Cooler:
- Use Appropriate Thermal Paste: Apply a pea-sized amount of thermal paste to the CPU before attaching the cooler.
- Follow the Cooler's Instructions: Ensure the cooler is properly installed and securely fastened.
5. Installing the RAM:
- Open the RAM Slots: Open the clips on the RAM slots.
- Align the RAM: Align the notches on the RAM stick with the corresponding notches on the motherboard slot.
- Press Down Firmly: Press the RAM firmly into the slot until it clicks into place.
6. Installing Storage Devices:
- Connect SATA Drives: Connect SATA data and power cables to your HDDs and SSDs.
- Install M.2 SSDs: Carefully install M.2 SSDs into the M.2 slots, ensuring they are correctly aligned and seated. Refer to your motherboard's manual.
7. Installing the Graphics Card (If Necessary):
- Insert the Graphics Card: Insert the graphics card into the appropriate PCIe x16 slot.
- Secure the Graphics Card: Secure the graphics card with the retaining clip.
8. Installing Other Expansion Cards:
- Follow the Same Procedure: Use the appropriate slots and secure the cards properly.
9. Connecting the Front Panel Connectors:
- Consult the Motherboard Manual: Use the motherboard manual as a guide. These connectors are delicate, and incorrect installation can lead to malfunction. Take your time and double-check your work.
10. Connecting Power Supplies:
- Connect the 24-Pin ATX Power Connector: This is the main power connector for the motherboard.
- Connect the 4-Pin or 8-Pin CPU Power Connector: This supplies power to the CPU.
- Connect Peripheral Power Connectors: Connect power to other components, such as storage drives.
11. Cable Management:
- Neatly Route Cables: Route all cables neatly to improve airflow and aesthetics.
12. Testing the System:
- Connect the Monitor, Keyboard, and Mouse: Connect peripherals.
- Power On: Turn on the system and check if it posts (Power On Self Test).
- Enter the BIOS/UEFI: Enter the BIOS/UEFI to verify the system is recognizing all components correctly.
Remember that proper grounding and careful handling are crucial throughout the entire process. Always refer to your motherboard and case manuals for specific instructions and diagrams. If you encounter any problems, consult online resources or seek help from experienced builders. Choosing and installing a motherboard is a significant step in computer building – proceed with patience and attention to detail, and you'll reap the rewards of a well-functioning and powerful system.
Latest Posts
Latest Posts
-
Most Hammer Drills Will Not Hammer Until Pressure Is
Apr 01, 2025
-
Which Of The Following Products Helps Prevent Nails From Splitting
Apr 01, 2025
-
Murder Mystery In The Pickelson Mansion Answer Key
Apr 01, 2025
-
Themes In Chronicle Of A Death Foretold
Apr 01, 2025
-
Summary Of Chapter 1 Scarlet Letter
Apr 01, 2025
Related Post
Thank you for visiting our website which covers about Advanced Hardware Lab 2-5 Select And Install A Motherboard . We hope the information provided has been useful to you. Feel free to contact us if you have any questions or need further assistance. See you next time and don't miss to bookmark.
