Advanced Hardware Lab 4-3 Troubleshoot The Electrical System
Onlines
Mar 19, 2025 · 6 min read
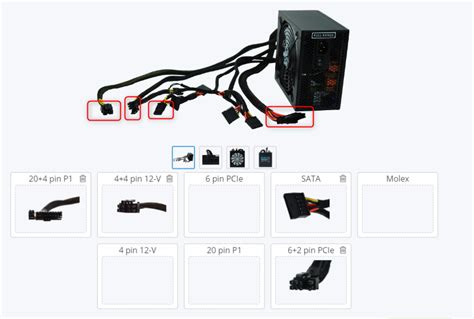
Table of Contents
Advanced Hardware Lab 4-3: Troubleshooting the Electrical System – A Comprehensive Guide
Troubleshooting electrical systems can be daunting, especially within the complex landscape of advanced hardware. This comprehensive guide delves into the practical aspects of troubleshooting electrical systems, specifically focusing on the challenges and solutions encountered in an advanced hardware lab setting (like a Lab 4-3 scenario). We will cover systematic approaches, common issues, safety precautions, and advanced techniques. This guide is designed to equip you with the knowledge and skills to effectively diagnose and resolve electrical problems, minimizing downtime and maximizing efficiency.
Understanding the Fundamentals: A Pre-Troubleshooting Checklist
Before diving into specific troubleshooting scenarios, a solid understanding of fundamental electrical concepts is crucial. This includes:
1. Basic Electrical Theory:
- Ohm's Law (V=IR): This foundational law governs the relationship between voltage (V), current (I), and resistance (R). Understanding this law is paramount in diagnosing voltage drops, current surges, and resistance problems. You must be able to calculate any one of these values given the other two.
- Kirchhoff's Laws: These laws (Kirchhoff's Current Law and Kirchhoff's Voltage Law) are essential for analyzing complex circuits with multiple branches and loops. They help in understanding how current flows and voltage distributes within a circuit.
- Series and Parallel Circuits: Knowing the difference between these circuit configurations is vital. Series circuits have a single path for current flow, while parallel circuits offer multiple paths. Troubleshooting techniques differ significantly depending on the circuit type.
- AC vs. DC: Alternating current (AC) and direct current (DC) behave differently. Understanding their characteristics is critical, particularly when dealing with power supplies, motors, and other AC/DC components.
2. Common Electrical Components:
Familiarity with common components like resistors, capacitors, inductors, diodes, transistors, integrated circuits (ICs), and power supplies is essential. Understanding their function and how they interact within a circuit is key to effective troubleshooting.
3. Safety First:
- Always disconnect power: Before undertaking any troubleshooting, always disconnect the power supply to the circuit. This prevents electric shock and potential damage to components.
- Use appropriate safety equipment: Wear safety glasses, gloves, and anti-static wrist straps to protect yourself from potential hazards.
- Know your limits: If you are unsure about any aspect of the troubleshooting process, seek assistance from an experienced technician or instructor. Never attempt to troubleshoot equipment beyond your skill level.
Systematic Troubleshooting Methodology
A structured approach is crucial for efficient and accurate troubleshooting. Follow these steps:
1. Observe and Document:
- Identify the symptom: Precisely describe the problem. Is the system not powering on? Are there flickering lights? Are there any unusual sounds or smells?
- Gather information: Note any recent changes to the system, such as new components added or software updates installed.
- Document your findings: Keep a detailed record of your observations, measurements, and troubleshooting steps. This is crucial for future reference and for identifying patterns.
2. Visual Inspection:
Carefully examine the entire electrical system for any obvious problems, such as:
- Loose connections: Look for loose wires, corroded terminals, or broken connectors.
- Damaged components: Check for burnt resistors, capacitors, or other damaged components.
- Physical damage: Inspect for signs of physical damage, such as cracks, burns, or water damage.
3. Use Appropriate Test Equipment:
- Multimeter: This versatile tool measures voltage, current, and resistance. It's your primary tool for diagnosing electrical problems.
- Oscilloscope: For advanced troubleshooting, an oscilloscope is useful for visualizing waveforms and identifying signal integrity issues.
- Logic Analyzer: Used to analyze digital signals and identify logic errors in digital circuits.
- Power Supply: A variable power supply allows you to control voltage and current levels for testing purposes.
4. Isolate the Problem:
Use the multimeter to systematically check components and connections, isolating the faulty area. Start with the power source and work your way through the circuit.
5. Test Individual Components:
Once you've narrowed down the problem area, test the individual components using the multimeter. Check for shorts, opens, and incorrect values.
6. Replace Faulty Components:
Once a faulty component is identified, replace it with a new one of the same type and specifications. Always ensure the replacement component has the correct wattage and voltage ratings.
7. Verify the Repair:
After replacing a component, thoroughly test the entire system to ensure the problem is resolved. Double-check all connections and measurements.
Common Electrical System Problems in Advanced Hardware Labs
Here are some common issues you might encounter in an advanced hardware lab environment:
1. Power Supply Issues:
- Insufficient power: The power supply might not be providing enough voltage or current to meet the system's requirements. This can result in erratic behavior or system failure.
- Power supply failure: The power supply itself could be faulty. Check for output voltages and currents with a multimeter.
- Overload protection: A circuit breaker or fuse might have tripped due to an overload. Check and reset them cautiously.
2. Short Circuits:
A short circuit occurs when two conductors with different potentials are directly connected, resulting in a large current flow. This can damage components and potentially cause a fire. Identify and repair the short circuit immediately.
3. Open Circuits:
An open circuit occurs when a break in the circuit path interrupts the flow of current. This can prevent a component from functioning correctly or completely shut down a system.
4. Grounding Problems:
Improper grounding can lead to safety hazards and erratic system behavior. Ensure proper grounding techniques are followed to prevent static discharge, electric shocks and ensure reliable system operation.
5. Component Failures:
Individual components, such as resistors, capacitors, or integrated circuits, can fail due to age, wear, or overstress. Use a multimeter to check individual components against their specifications.
Advanced Troubleshooting Techniques
These techniques are more suited for experienced technicians:
1. Signal Tracing:
Using an oscilloscope, trace signals through the circuit to identify signal integrity issues or unexpected signal levels.
2. Logic Analysis:
Using a logic analyzer, examine digital signals to identify logic errors or timing problems in digital circuits.
3. Current Tracing:
Use a current probe and an oscilloscope to measure current flows at different points in the circuit, helping pinpoint locations of excessive current draw or unusual current patterns.
4. Spectral Analysis:
Use a spectrum analyzer to analyze the frequency components of signals to identify noise or interference issues. This technique is extremely valuable in high-frequency circuits.
Documentation and Reporting
Thorough documentation is essential. Maintain a detailed log of all observations, measurements, and troubleshooting steps. This documentation is crucial for future reference, problem analysis, and creating reports.
Include the following in your reports:
- Detailed description of the problem: Include the symptoms, observations and any initial hypotheses.
- Troubleshooting steps taken: Clearly document the methods used to diagnose the problem and isolate the faulty component(s).
- Measurements and results: Include accurate measurements taken using test equipment, such as voltage, current and resistance readings.
- Corrective actions taken: Explain the repairs, replacements and any modifications made to resolve the problem.
- Verification of the repair: Detail the tests conducted to verify that the repair was successful and the system is functioning correctly.
By following this comprehensive guide and applying these troubleshooting techniques, you'll significantly improve your ability to diagnose and resolve electrical system problems efficiently and safely within your advanced hardware lab setting. Remember that safety and a systematic approach are key to success in this field. Consistent practice and attention to detail will build your confidence and competence in troubleshooting complex electrical systems.
Latest Posts
Latest Posts
-
Chemical Formulas Phet Simulation Answer Key
Mar 19, 2025
-
What Is Prohibited In A Command Economy Select Two Answers
Mar 19, 2025
-
1 2 3 Explore Multiple Locations In A Lab
Mar 19, 2025
-
Ati Nursing Skill Template Medication Administration
Mar 19, 2025
-
A Silvia No Le Gusta Mucho El Chocolate
Mar 19, 2025
Related Post
Thank you for visiting our website which covers about Advanced Hardware Lab 4-3 Troubleshoot The Electrical System . We hope the information provided has been useful to you. Feel free to contact us if you have any questions or need further assistance. See you next time and don't miss to bookmark.
