Hardware Lab Simulation 6-2 Laptop Wireless Card Replacement
Onlines
Mar 15, 2025 · 7 min read
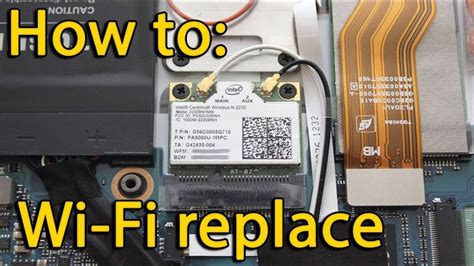
Table of Contents
Hardware Lab Simulation: A Comprehensive Guide to Replacing a Laptop Wireless Card (6-2)
The digital age demands constant connectivity. When a laptop's wireless card fails, it disrupts workflow and limits access to essential online resources. This guide will walk you through a simulated hardware lab experience focused on replacing a laptop's wireless card, specifically addressing a hypothetical "6-2" model for educational purposes. While the specific model number is fictional, the procedures and concepts are directly applicable to real-world scenarios. This detailed simulation will cover safety precautions, troubleshooting, component identification, the replacement process, and post-replacement verification.
I. Safety First: Preparing for the Hardware Lab Simulation
Before beginning any hardware manipulation, safety is paramount. This simulation emphasizes the importance of these precautions, which should always be followed in a real-world setting:
1. Static Electricity Protection:
- ESD (Electrostatic Discharge) Wrist Strap: Always use an anti-static wrist strap connected to a grounded surface to prevent electrostatic discharge from damaging sensitive components. Static electricity is a silent killer of electronics, capable of frying even the most robust components.
- Anti-Static Mat: Work on an anti-static mat to provide an extra layer of protection against electrostatic discharge.
- Proper Grounding: Ensure your workstation is properly grounded to eliminate the risk of static buildup.
2. Power Down and Disconnect:
- Complete Shutdown: Completely shut down the laptop before attempting any hardware replacement. Do not simply hibernate or put it to sleep. This prevents accidental data loss and protects against potential electrical shocks.
- Remove Power Source: Unplug the power adapter from both the laptop and the wall outlet. Removing the power source eliminates any risk of accidental power surges during the repair process.
- Remove the Battery (if removable): If the laptop battery is removable, remove it. This provides additional safety by completely isolating the system from any power source.
3. Workspace Preparation:
- Clean and Organized Workspace: Maintain a clean and organized workspace to prevent accidental damage to components or short circuits.
- Proper Lighting: Ensure adequate lighting to clearly see the components and avoid mistakes during the replacement process.
- Tools and Components Gathered: Gather all the necessary tools and the replacement wireless card before you start. This will streamline the process and reduce interruptions.
II. Diagnosing the Problem: Troubleshooting the Wireless Connection
Before assuming the wireless card is faulty, it's crucial to rule out other potential causes of connectivity issues. This diagnostic phase is essential in any hardware troubleshooting process.
1. Basic Troubleshooting Steps:
- Check the Router: Verify that your Wi-Fi router is working correctly and that other devices can connect without issue. A faulty router is a frequent source of connectivity problems.
- Check Wireless Settings: Ensure the laptop's wireless adapter is enabled in the operating system's settings. The adapter might be accidentally disabled.
- Check Network Drivers: Ensure that the correct wireless network drivers are installed and up-to-date. Outdated or corrupted drivers are a common cause of wireless connectivity problems.
- Restart the Laptop: Sometimes a simple restart can resolve temporary software glitches that affect the wireless connection.
- Run Network Diagnostics: Use the operating system's built-in network diagnostic tools to identify any specific issues with the wireless connection. Windows and macOS offer such tools.
2. Advanced Troubleshooting (If Basic Steps Fail):
- Check the Wireless Card's Physical Connection: If accessible, visually inspect the wireless card's connection within the laptop. Loose connections can interrupt the signal. (This step is usually only accessible after opening the laptop.)
- Try a Different Wireless Network: Attempt to connect to a different wireless network to rule out issues with the specific network you're trying to access.
- Use a Wired Connection: If possible, connect the laptop to the internet using an Ethernet cable to confirm whether the issue is with the wireless connection itself or a broader network problem.
III. Hardware Lab Simulation: Replacing the Wireless Card (6-2)
This section simulates the physical replacement of the hypothetical "6-2" wireless card. Remember, this is a simulation; you should refer to your specific laptop's service manual for actual component locations and procedures.
1. Opening the Laptop: Accessing the Wireless Card
- Locate Access Panels: Consult your laptop's service manual to identify the access panel covering the wireless card. This panel is typically located on the bottom or side of the laptop.
- Remove the Access Panel: Use a suitable tool (often a small plastic pry tool) to carefully remove the access panel. Avoid excessive force, which can damage the laptop's casing.
- Locate the Wireless Card: Identify the wireless card within the laptop chassis. It's typically a small, rectangular card with an antenna connector.
2. Removing the Old Wireless Card
- Disconnect Antenna Cables: Carefully disconnect the antenna cables from the old wireless card. These cables are usually delicate, so handle them with extreme care. Note the placement and orientation before disconnecting, as they must be reconnected precisely.
- Release the Wireless Card: Most wireless cards use a simple latch mechanism. Gently release the latch and carefully remove the card from its slot.
3. Installing the New Wireless Card
- Align the New Card: Carefully align the new wireless card with its slot, ensuring it is correctly oriented.
- Secure the New Card: Gently press the new card into its slot until it snaps into place. Ensure it's firmly seated to avoid poor contact.
- Reconnect Antenna Cables: Carefully reconnect the antenna cables to the new wireless card, matching their original placement and orientation.
4. Reassembling the Laptop
- Replace the Access Panel: Carefully replace the access panel, ensuring it's properly seated.
IV. Post-Replacement Verification: Testing the New Wireless Card
After completing the replacement, it's crucial to verify that the new wireless card is working correctly. This step ensures the success of the repair process and avoids unnecessary troubleshooting later on.
1. Power On the Laptop:
- Reconnect the Battery (if applicable): Reconnect the battery if you removed it.
- Connect the Power Adapter: Connect the power adapter to the laptop and the wall outlet.
- Power On: Power on the laptop.
2. Check Wireless Connectivity:
- Enable Wireless Adapter: Verify that the wireless adapter is enabled in the operating system's settings.
- Scan for Networks: Scan for available wireless networks.
- Connect to a Network: Connect to a known wireless network and test the internet connectivity.
3. Test Network Performance:
- Check Speed and Reliability: Test the speed and reliability of the wireless connection using online speed tests and browsing various websites. The connection should be noticeably improved.
4. Driver Verification:
- Check Device Manager (Windows) or System Information (macOS): Verify that the new wireless card is correctly recognized by the operating system and that the appropriate drivers are installed.
V. Troubleshooting Post-Replacement Issues
Even after carefully following all steps, issues might persist. This section addresses common post-replacement problems and their solutions.
1. No Wireless Connection:
- Check Cable Connections: Double-check all antenna cable connections to ensure they are securely attached.
- Check Driver Installation: Verify that the correct drivers are installed for the new wireless card. The operating system may need to be prompted to install them automatically.
- Check Device Manager/System Information: Check for any error messages related to the wireless adapter.
2. Slow or Intermittent Wireless Connection:
- Check for Interference: Interference from other electronic devices can affect wireless signal strength. Try moving the laptop to a different location to see if this helps.
- Check Router Settings: Review your router's settings to ensure there are no restrictions or limitations affecting the wireless network's performance.
- Update Router Firmware: An outdated router firmware can sometimes cause wireless connection issues. Check for updates and install them if needed.
3. Wireless Card Not Recognized:
- Check for Hardware Compatibility: Ensure the new wireless card is compatible with the laptop's motherboard and BIOS.
- Check BIOS Settings: In some rare cases, BIOS settings might need to be adjusted to correctly recognize the new wireless card.
- Consult the Laptop's Service Manual: Check the service manual to confirm compatibility and installation procedures.
VI. Conclusion: Mastering Hardware Lab Simulations
This comprehensive guide provided a simulated experience of replacing a laptop's wireless card. Remember, while the specific "6-2" model is fictional, the core principles and steps are transferable to real-world scenarios. Always prioritize safety and thoroughly troubleshoot before resorting to hardware replacement. Properly completing this procedure requires patience, attention to detail, and a solid understanding of basic hardware concepts. By practicing these steps in a simulated environment, you build confidence and gain practical experience for future hardware troubleshooting and repair tasks. Mastering hardware lab simulations helps cultivate the essential skills required for effective problem-solving and maintaining optimal digital connectivity. Remember, consistency in applying the safety procedures and a methodical approach are crucial for success.
Latest Posts
Latest Posts
-
One Source Of Lead On Some Job Sites Is
Mar 17, 2025
-
When Responding To Litigation Holds Foia Requests Investigations Or Inquiries
Mar 17, 2025
-
Participant Motivation Is Usually The Result Of
Mar 17, 2025
-
All Flags Such As Porn And Upsetting Offensive Are Query Independent
Mar 17, 2025
-
An Electrical Motor Provides 0 50 W Of Mechanical Power
Mar 17, 2025
Related Post
Thank you for visiting our website which covers about Hardware Lab Simulation 6-2 Laptop Wireless Card Replacement . We hope the information provided has been useful to you. Feel free to contact us if you have any questions or need further assistance. See you next time and don't miss to bookmark.
