Label The Photomicrograph Based On The Hints Provided
Onlines
Mar 16, 2025 · 5 min read
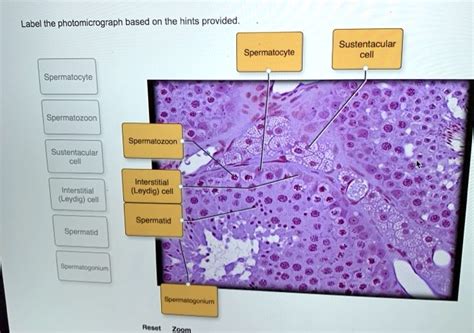
Table of Contents
Labeling Photomicrographs: A Comprehensive Guide with Hints and Techniques
Photomicrography, the art of capturing images through a microscope, provides invaluable insights into the microscopic world. However, a photomicrograph is only as useful as our ability to interpret it. Accurate labeling is crucial for understanding the structures and processes depicted, whether for scientific research, educational purposes, or simply personal exploration. This comprehensive guide provides a step-by-step approach to labeling photomicrographs effectively, utilizing hints and contextual clues to ensure accuracy and clarity.
Understanding the Importance of Accurate Labeling
Before diving into the techniques, let's emphasize the paramount importance of correct labeling. A poorly labeled photomicrograph can lead to misinterpretations, flawed conclusions, and even wasted research efforts. Accurate labeling allows for:
- Clear Communication: A labeled image facilitates precise communication of observations and findings to others.
- Reproducibility: Properly labeled images enable others to replicate your experiments and validate your results.
- Data Integrity: Accurate labeling ensures the integrity of your scientific data and prevents ambiguity.
- Educational Value: In educational settings, clear labeling is essential for effective learning and understanding.
Deciphering Hints and Contextual Clues
Effective labeling often relies on understanding the context surrounding the photomicrograph. This includes:
- The Specimen: What organism or material is being examined? Knowing the source is crucial for identifying structures. For example, a photomicrograph of plant tissue will have different structures than an animal tissue sample.
- The Staining Technique: Different stains highlight specific cellular components. Knowing the staining method helps you identify what you're seeing. Hematoxylin and eosin (H&E) stain, for example, is commonly used in histology to highlight nuclei and cytoplasm. Gram staining differentiates bacteria based on cell wall composition.
- Magnification: The magnification level provides scale, allowing you to estimate the size of structures. This is usually indicated on the image itself or in accompanying documentation.
- Experimental Conditions: Understanding the conditions under which the photomicrograph was obtained (e.g., specific treatments, growth medium) can influence interpretation.
- Accompanying Text or Legends: Any text provided alongside the photomicrograph, such as a figure legend or caption, can provide invaluable information.
Step-by-Step Guide to Labeling Photomicrographs
Let's break down the labeling process into manageable steps:
1. Preparation:
- Gather Your Materials: You'll need the photomicrograph, labeling tools (a computer with image editing software, a pen and paper, or a specialized annotation tool), and a good reference source (textbooks, online databases, etc.).
- Review the Hints and Context: Carefully review all available information about the specimen, staining techniques, magnification, and experimental conditions.
2. Identification of Key Structures:
- Start with the Obvious: Begin by identifying the most prominent and easily recognizable structures. This provides a foundation for labeling less obvious features.
- Use Your Reference Materials: Refer to textbooks, online databases, or other resources to confirm your identification of structures. Consult atlases of histology, microbiology, or botany, depending on the nature of your specimen.
- Pay Attention to Detail: Examine the image carefully, focusing on size, shape, and location of structures. Consider their relationships with one another.
3. Labeling the Photomicrograph:
- Consistency is Key: Develop a consistent labeling system for all your images. This will improve clarity and reproducibility. Consider using standard abbreviations and terminology.
- Clear and Concise Labels: Keep labels concise, accurate, and unambiguous. Avoid overly technical jargon unless necessary.
- Appropriate Placement: Place labels strategically to avoid obscuring important features of the image. Use arrows or lines to connect labels to the relevant structures.
- Font Size and Style: Use a font that is easy to read and consistently sized. Ensure that the labels do not dominate the image.
- Scale Bar: Include a scale bar to indicate magnification. This allows others to gauge the size of structures accurately.
4. Verification and Refinement:
- Double-Check Your Work: Before finalizing your labels, carefully review your work to ensure accuracy and consistency. Have someone else review your labels for accuracy.
- Iterative Process: Labeling is often an iterative process. You may need to refine your labels as you gain a deeper understanding of the image.
Advanced Techniques and Considerations
- Software for Annotation: Several software packages are specifically designed for annotating images. These often offer features like drawing tools, text boxes, and measurement tools.
- Digital Images: Digital photomicrographs are easier to manipulate and label compared to physical prints.
- Color-Coding: Color-coding can improve the visual clarity of complex images by grouping similar structures together.
- Multiple Labels: Some images may require multiple layers of labels, with different levels of detail.
- Legend or Caption: Always provide a legend or caption that summarizes the key features of the image and clarifies any abbreviations used.
Examples of Photomicrograph Labeling with Hints
Let's consider a few hypothetical examples demonstrating the process:
Example 1: Plant Cell
Hints: The image shows a plant cell stained with iodine. The magnification is 400x.
Labeling:
- Cell Wall: Thick outer layer (label with an arrow pointing to the outer boundary).
- Cell Membrane: Inner layer just inside the cell wall (label with an arrow).
- Chloroplasts: Oval-shaped green organelles (label several with arrows).
- Nucleus: Darkly stained, centrally located structure (label with an arrow).
- Vacuole: Large central region (label with an arrow).
- Scale Bar: Include a scale bar indicating 10 µm (micrometers).
Example 2: Bacterial Sample
Hints: Gram-stained bacterial sample, magnification 1000x. Cocci and bacilli are present.
Labeling:
- Gram-positive Cocci: Purple, spherical bacteria (circle and label several).
- Gram-negative Bacilli: Pink, rod-shaped bacteria (circle and label several).
- Scale Bar: Include a scale bar indicating 1 µm (micrometer).
Example 3: Histological Section of Mammalian Tissue
Hints: H&E stained section of mammalian liver tissue. Magnification 400x.
Labeling:
- Hepatocytes: Polygonal liver cells (label several).
- Nuclei: Darkly stained, round structures within hepatocytes (label several).
- Central Vein: Large blood vessel (label with an arrow).
- Bile Duct: Smaller duct (label with an arrow).
- Scale Bar: Include a scale bar indicating 50 µm (micrometers).
Conclusion: Precision and Clarity in Microscopy
Precise labeling of photomicrographs is a critical skill for anyone working with microscopy. By following the steps outlined in this guide and utilizing the contextual clues provided, you can ensure that your images are accurately represented, effectively communicating your observations and findings to others. Remember that consistent labeling, attention to detail, and the use of appropriate reference materials are key to creating clear and informative photomicrographs that contribute to scientific understanding and progress. Mastering this skill will significantly enhance your ability to interpret microscopic data and share your discoveries effectively.
Latest Posts
Latest Posts
-
When Responding To Litigation Holds Foia Requests Investigations Or Inquiries
Mar 17, 2025
-
Participant Motivation Is Usually The Result Of
Mar 17, 2025
-
All Flags Such As Porn And Upsetting Offensive Are Query Independent
Mar 17, 2025
-
An Electrical Motor Provides 0 50 W Of Mechanical Power
Mar 17, 2025
-
Studying Marketing Should Help You To Blank
Mar 17, 2025
Related Post
Thank you for visiting our website which covers about Label The Photomicrograph Based On The Hints Provided . We hope the information provided has been useful to you. Feel free to contact us if you have any questions or need further assistance. See you next time and don't miss to bookmark.
